When writing a blog in WordPress, you definitely want to utilize Google Analytics to track your traffic. A hugely robust and free service, you can leverage insights from the analytics to determine what types of content generate the most traffic and engagement on your site, what communications strategies bring in the most traffic and the highest quality traffic, and the effectiveness of your navigation and linking strategies, among countless other things. (If you want to learn more about Google Analytics, I recommend Analytics Academy, from Google.)
You can cause serious problems with your data integrity though, particularly for lower-trafficked sites, if you’re tracking WordPress preview pages in your data set. If you’re like me, you preview a post countless times before publishing to ensure that things look, feel, and behave just right. The problem is that once you’ve added your analytics snippet to your template, the snippet begins tracking every time that template is loaded.
This means all your previews are driving up your pageviews and impacting countless other metrics. And quite frankly, I can’t think of a situation where I’d ever be interested in data surrounding my previewing habits!
To correct such madness you simply need to create a filter in Google Analytics to exclude data derived from viewing preview pages.
Filtering Preview Pages
Before creating any filters, you should create a new View within your analytics property. This creates a duplicate data set within Google Analytics for you to test on; if something goes wrong and your data gets screwed up, you’ll still have the original view to refer to with all the good data you need. To create a new View:
- Sign in to Google Analytics and click Admin in the top navigation.
- Make sure the two drop-downs on the left are set to the appropriate Account and Property for your site.
- In the View dropdown, select Create new view. Give it a meaningful name like “Filter testing,” and set your timezone settings as necessary.
- Finally, click Create View.
Once you’ve got your new view created, return to the Admin screen and ensure that your test view is selected in the far right column. Now we’ll create the filter to remove preview pages:

- Click Filters in the View column, and then click the +NEW FILTER button.
- Give your filter a meaningful name like “Exclude Preview Traffic.”
- For Filter Type, select the Custom filter radio button.
- Leave the next radio button on Exclude, which should be the default choice.
- In the Filter Field drop-down menu, select Request URI.
- In the Filter Pattern text field, enter preview=true
(The reason we are entering this text is that it is included in the address of every single WordPress preview page!) - Click Save.
Done. Easy as pie!
Testing Your Filter
If you want to be sure that your new filter is working correctly, you do not have to wait for Google Analytics to collect data over the next few days; you can use Google’s real-time reporting feature to check your work:
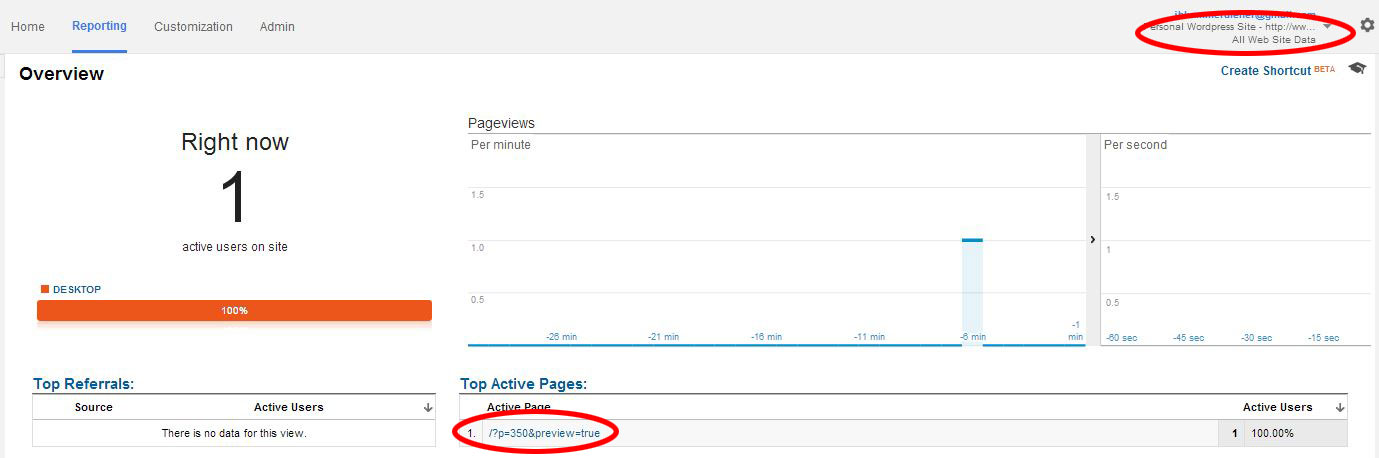
- Start by opening your site’s WordPress dashboard, opening a post in edit mode, and then previewing it.
- In a new tab, open up Google Analytics, and go to Reporting for your original, unfiltered view (remember how we made a duplicate?).
- Click Real-Time in the left navigation, and then choose Overview. If you are a low-traffic site you should see your preview page in the Top Active Pages listing. (If you’re a higher-traffic site, you may have to check the list at Real-Time > Content to find your preview page).
- Once you’ve confirmed that your unfiltered view is recording your preview page, click your view name at the upper right of the window, and switch to your filtered view.
- The page should reload the Real-Time Overview, and if your filter is working correctly you’ll see all the same active pages, except one… there should be no preview page!
[alert type=alert-red ]Note that this method was tested on WordPress 3.8 and 3.9 at the time of this writing.[/alert]